
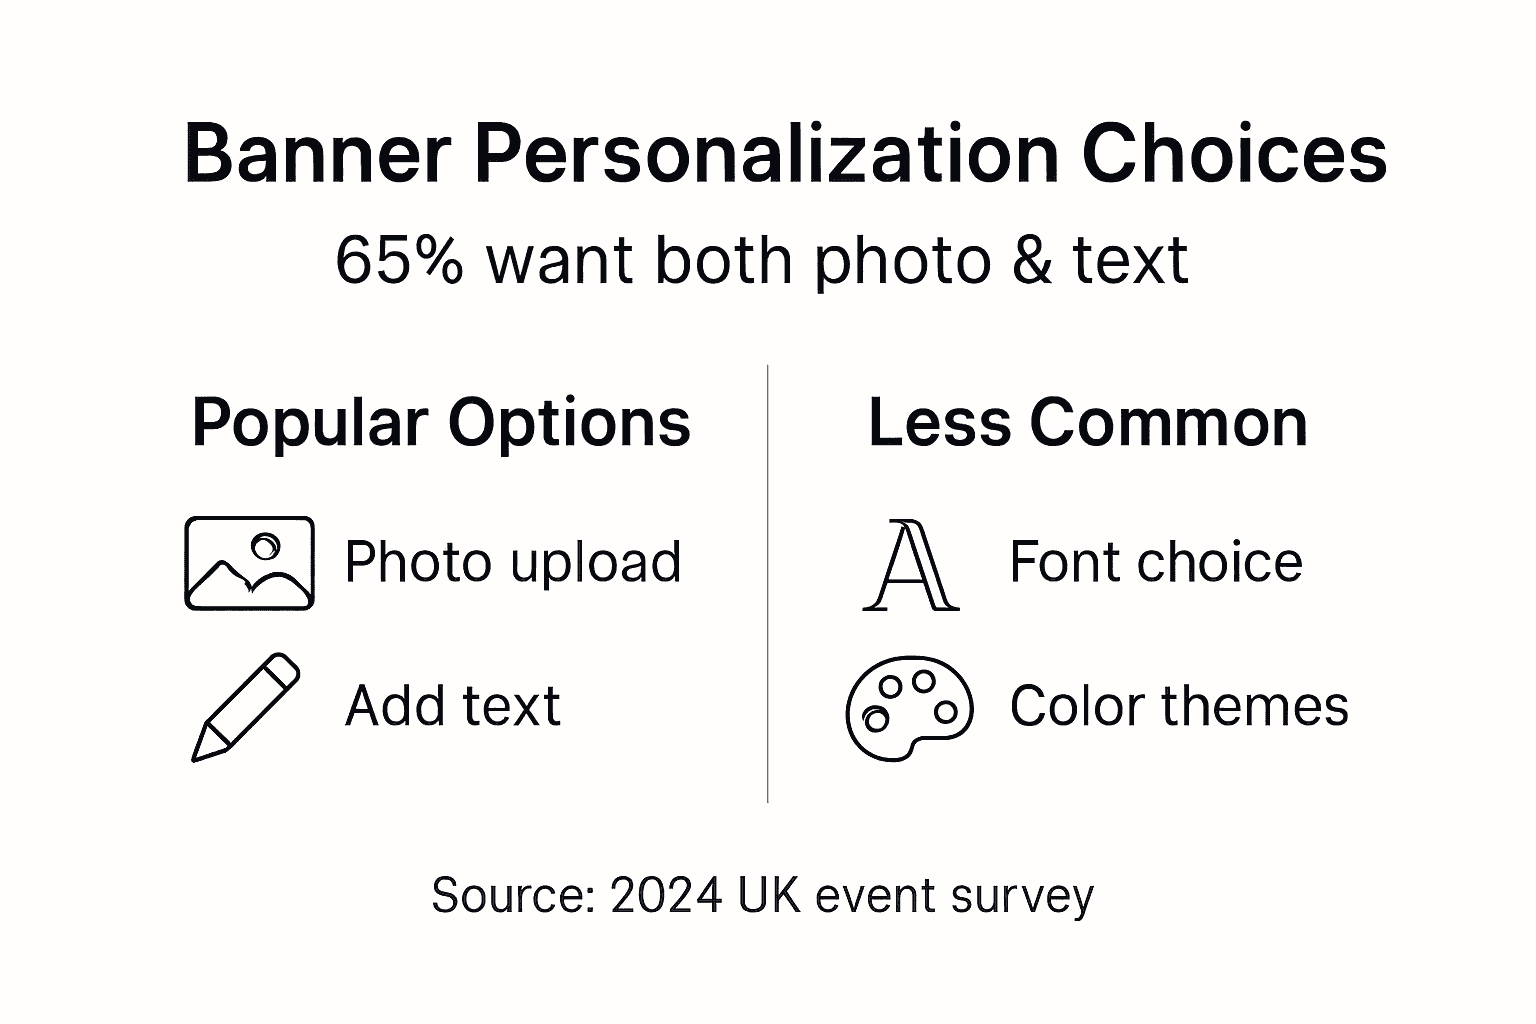
Event Banner Personalization: 65% Request Photo & Text Options
Creating the perfect personalized banner for your child’s birthday or family milestone shouldn’t feel overwhelming. Yet many parents and event planners struggle with sizing decisions, material choices, and design elements that ultimately determine whether their celebration décor looks professional or disappointing. This guide walks you through every step of banner personalization, from initial planning to final delivery, ensuring you avoid common pitfalls and create memorable decorations that guests will admire and photograph.
Table of Contents
- Prerequisites: What You Need Before Designing Your Banner
- Step-by-Step Design Process Using Online Tools
- Material and Durability Considerations for UK Events
- Ordering Timeline and Delivery Expectations in the UK
- Common Mistakes and How to Avoid Them
- Sizing and Placement Tips for Effective Banner Use
- Expected Results and Success Metrics
- Discover Our Personalized Birthday Banner Collection
- FAQ
Key Takeaways
| Point | Details |
|---|---|
| Proper sizing and theme alignment | Ensures your banner fits the venue perfectly and complements existing party décor without crowding or appearing out of place. |
| Durable, weather-appropriate materials | Choosing the right material based on indoor or outdoor use extends banner life and maintains visual appeal throughout the event. |
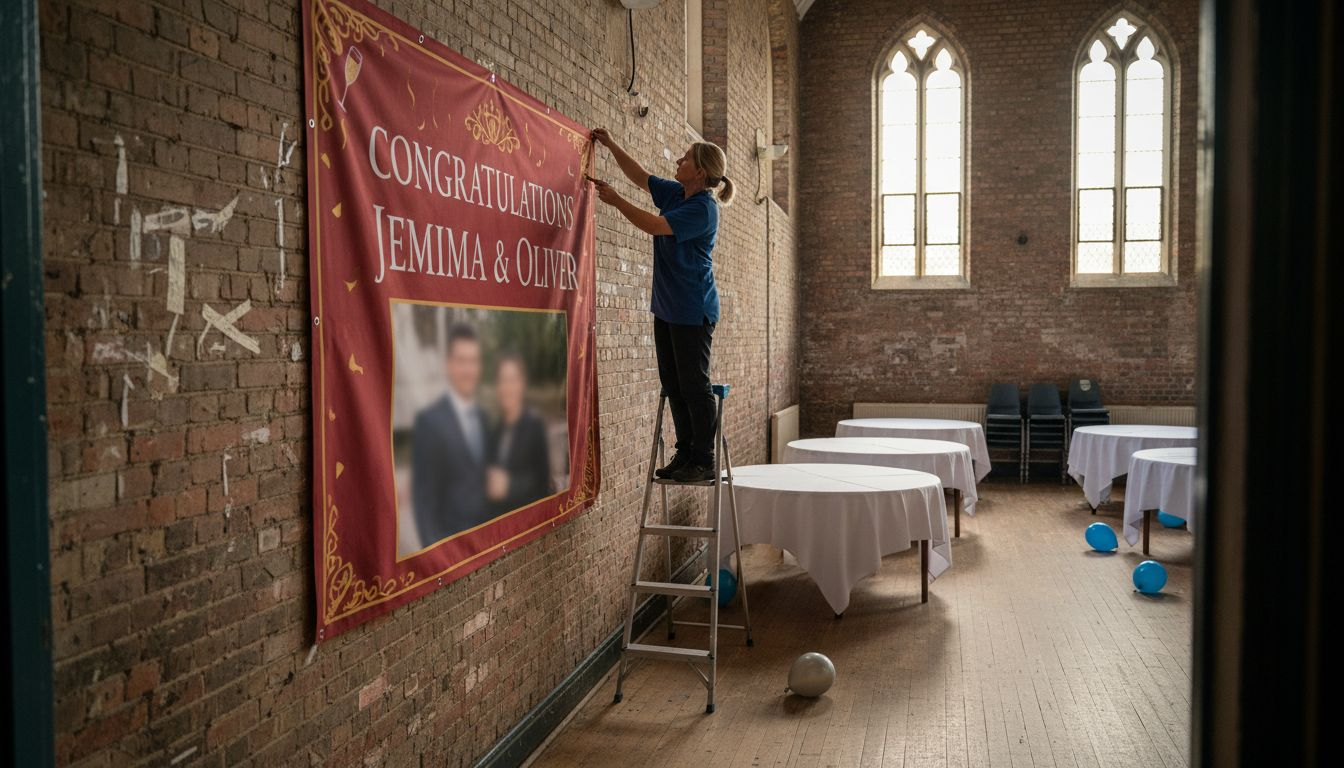
| Photo and text personalization | Adding custom images and messages creates emotional connections that make celebrations more memorable for families and guests. |
| Early ordering with quality finishing | Allows adequate production time and includes options like hemming and eyelets that improve installation ease and longevity. |
| Avoiding common design mistakes | Prevents issues like low resolution images, unreadable fonts, and poor colour choices that diminish banner effectiveness. |
Prerequisites: What You Need Before Designing Your Banner
Before you start designing, gather essential information that will guide every decision. Rushing into design without proper preparation leads to frustration and costly mistakes.
First, clarify your party theme and colour palette. Whether you’re planning a superhero birthday party or an elegant christening celebration, your banner should reinforce these visual elements rather than clash with them. Write down your primary and secondary colours so you can match them precisely in the design tool.
Measure your venue space carefully. Use a tape measure to determine the exact width and height where the banner will hang. Consider obstacles like doors, windows, or light fixtures that might interfere with placement. Note whether the space is indoors or outdoors, as this affects material selection.
Collect all personalization details upfront:
- Child’s full name and correct spelling
- Event date and age being celebrated
- Any special phrases or messages you want featured
- High resolution photos you plan to include (check file size and quality)
- Guest count to gauge how far away most viewers will stand
Determine your material preference based on venue conditions. Indoor events allow lighter, more economical materials, while outdoor celebrations demand waterproof and UV resistant options. Consider whether you want to keep the banner as a keepsake, which might justify premium materials.
Set a realistic budget including shipping costs. Factor in finishing options like reinforced edges and metal eyelets, which add durability but increase price. Check delivery timelines against your event date to ensure adequate buffer time for potential delays.
Step-by-Step Design Process Using Online Tools
Once you’ve gathered your prerequisites, the actual design process becomes straightforward. Most online banner tools follow similar patterns, making them accessible even for first time users.
-
Browse templates matching your event theme. Look for customizable birthday banner theme options that align with your party’s style, whether that’s princess, dinosaur, or minimalist modern designs.
-
Upload your photos and check resolution warnings. The system will typically alert you if images are too low quality. Photo and message personalization features rank among the top three requested elements, with 65% of UK buyers prioritizing these customization options for children’s party banners.
-
Add personalized text including names, ages, and event specific messages. Type carefully and double check spelling, as errors become permanent once printed.
-
Select fonts that balance style with readability. Avoid overly decorative scripts that become illegible from a distance. Choose colours that contrast sharply with the background for maximum visibility.
-
Preview your design at actual size if the tool allows. Zoom in to check text clarity and image sharpness. View the banner on different devices to ensure colours display consistently.
-
Choose your material and finishing options before checkout. Specify whether you need eyelets for hanging, reinforced edges for durability, or weather resistant coating for outdoor use.
-
Submit your order with delivery address and preferred shipping method. Save a copy of your design for future reference or reordering.
Pro tip: Create your design several days before ordering to give yourself time to review it with fresh eyes. You’ll often spot improvements or errors you missed during the initial excitement of designing.
Material and Durability Considerations for UK Events
Material selection dramatically impacts how your banner performs during the event and whether it survives for future use. Understanding the differences helps you balance cost against quality based on your specific needs.
Vinyl and PVC materials offer excellent waterproofing and weather resistance, making them ideal for outdoor garden parties or unpredictable UK weather. They’re heavier and more expensive but withstand rain, wind, and direct sunlight without fading or tearing. These materials work brilliantly for milestone events you want to photograph extensively outdoors.
Economy coated polyester provides a budget friendly option for indoor use or single event applications. It prints colours vibrantly and costs considerably less than premium alternatives. However, it offers minimal weather protection and may show wear if handled roughly or exposed to moisture.
Premium 100% polyester delivers a matte finish that photographs beautifully without glare, preferred for formal milestone family events versus casual children’s parties. This material choice impacts both cost and banner quality, offering durability somewhere between economy and vinyl options.
| Material Type | Best For | Weather Resistance | Cost Level | Finish Quality |
|---|---|---|---|---|
| PVC/Vinyl | Outdoor events | Excellent | High | Glossy, vibrant |
| Premium Polyester | Formal milestones | Good | Medium-High | Matte, elegant |
| Economy Polyester | Indoor parties | Poor | Low | Standard |
| Coated Fabric | Mixed conditions | Moderate | Medium | Semi-gloss |
Finishing options matter as much as base material. Reinforced hemming and metal eyelets improve ease of installation and reduce banner damage during hanging, increasing longevity and usefulness for repeat use. These professional touches cost extra but prevent rips at stress points where you attach hanging hardware.
For indoor use banner materials, lighter weight options work perfectly and cost less. Save premium materials for outdoor events where environmental factors justify the investment. Consider banner finishing options that match your installation method, whether that’s pole pockets, grommets, or adhesive backing.
Pro tip: If you’re unsure about weather conditions, order waterproof materials even for partially covered outdoor spaces. UK weather changes rapidly, and a surprise rain shower can ruin an economy banner within minutes.
Ordering Timeline and Delivery Expectations in the UK
Timing your order correctly prevents last minute panic and ensures your banner arrives with days to spare. Understanding realistic production and shipping schedules helps you plan appropriately.
Standard production turnaround typically ranges from one to five working days depending on design complexity and material selection. Custom photo banners with multiple personalization elements may require longer processing than simple text based designs. Busy seasons like summer months and December often extend these timeframes due to high order volumes.
Next day delivery options exist but come with strict ordering deadlines, usually before midday on the previous working day. These expedited services cost significantly more and aren’t guaranteed during peak periods or for remote UK locations. Don’t rely on rush delivery as your primary plan.
Consider these delivery factors when planning your birthday banner ordering timeline:
- Most suppliers offer free shipping above specific order thresholds, typically £30 to £50
- Remote Scottish islands or Northern Ireland may add one to two days to standard delivery
- Bank holidays and weekends don’t count as working days in production schedules
- Tracking information helps you monitor progress and anticipate arrival
- Signature requirements may mean someone must be home to receive the package
Order at least two weeks before your event as a safety margin. This buffer accommodates unexpected delays, gives you time to request corrections if something arrives wrong, and reduces stress as your party date approaches. For milestone events like christenings or major birthdays, ordering three weeks ahead provides even greater security.
If you absolutely must order last minute, contact the supplier directly by phone rather than relying on automated systems. They can sometimes accommodate rush requests or suggest in stock alternatives that ship faster than fully customized options.
Common Mistakes and How to Avoid Them
Learning from others’ errors saves you disappointment and wasted money. These frequent mistakes account for most banner ordering complaints and are entirely preventable.
Incorrect size measurement causes frustration in roughly 30% of personalized banner orders. Customers either overestimate available space, resulting in banners that overwhelm the venue, or underestimate, creating banners too small to make visual impact. Always measure twice and compare your dimensions against common furniture sizes for perspective. A banner claiming to be two metres wide sounds large until you realize your sofa is nearly that long.
Skipping finishing options like reinforced hemming or metal eyelets undermines durability and makes hanging difficult, compromising the banner’s presentation and lifespan. These seemingly minor details determine whether your banner hangs straight and survives multiple events or tears at corners and sags awkwardly.
Late ordering creates unnecessary stress and sometimes forces you to accept whatever rush options exist rather than getting exactly what you want. Production delays, shipping problems, or correction needs become catastrophic when you’ve left insufficient time buffer. The few pounds saved by waiting for a sale rarely justify the anxiety.
Low image resolution produces pixelated, blurry prints that look unprofessional and disappoint. Phone photos often lack sufficient quality when enlarged to banner size. Check that images are at least 300 DPI at the size they’ll print, not just on your screen.
Poor font choices and clashing colours reduce readability from typical viewing distances. Script fonts that look elegant on screen become illegible on banners viewed from three metres away. Similarly, pastel text on light backgrounds creates insufficient contrast for outdoor viewing or photography.
Sizing and Placement Tips for Effective Banner Use
Choosing the right size and positioning your banner strategically maximizes its visual impact and ensures it enhances rather than dominates your party space.
Select banner dimensions proportional to your venue and guest count. Small gatherings in home living rooms need more modest banners, typically 1 to 1.5 metres wide, while large hall celebrations can accommodate 2 to 3 metre banners that remain visible from across the room. Consider ceiling height as well, as tall spaces make horizontal banners appear lost while vertical or larger formats fill the visual field better.
Place banners where they create natural photo backdrops without blocking traffic flow or essential venue features. Popular positions include:
- Behind the main party table or cake display, creating a focal point for photographs
- Near the entrance to welcome guests and set the celebration tone immediately
- Above gift tables or activity stations to define different party zones
- On exterior walls or fences for outdoor garden parties where they’re visible in group photos
For outdoor placement, secure banners against wind using adequate fixing points. A banner flapping loose or falling mid party creates safety hazards and looks unprofessional in photos. Use more eyelets than you think necessary and consider backup attachment methods.
Ensure text remains readable from where most guests will stand or sit. Test this by having someone hold a sign with similar sized text at the proposed banner location while you view from typical guest positions. If you squint to read it, your font size is too small.
Coordinate banner placement with other decorations so everything works together cohesively. Your banner should complement balloon arrangements, table settings, and colour schemes rather than competing for attention or clashing visually.
Expected Results and Success Metrics
Knowing what constitutes a successful banner outcome helps you evaluate whether your order met expectations and guides future ordering decisions.
Your completed banner should fit the designated space perfectly, neither overwhelming the area nor appearing too small to notice. It should hang straight and secure without sagging, wrinkling, or showing attachment damage.
Material and finish quality should withstand your event conditions completely. Outdoor banners must survive typical UK weather including light rain and wind without colours running or edges fraying. Indoor banners should photograph without glare or distortion under venue lighting.
Design elements including photos and text should appear crystal clear, properly aligned, and visually appealing from normal viewing distances. Colours should match your specifications closely, though minor variations from screen to print are normal. Personalization details must be spelled correctly and positioned as you designed.
Delivery should occur within the promised timeframe, arriving in protective packaging that prevents creasing or damage during transit. The banner should be ready to hang immediately without requiring special preparation or repairs.
Guest feedback provides the ultimate success measure. Comments about the banner’s appearance, appreciation of personalized touches, and requests to photograph near it indicate you’ve created something memorable. Many families report guests asking where they ordered their banners, suggesting your decoration choices impressed attendees enough to consider similar options for their own events.
Finally, a truly successful banner becomes a cherished keepsake you can store and potentially reuse or display long after the celebration ends, serving as a tangible reminder of the special occasion.
Discover Our Personalized Birthday Banner Collection
Now that you understand how to create the perfect personalized banner, explore our extensive collection designed specifically for children’s birthdays and family milestones. Our celebration theme birthday banners feature popular characters and designs that delight young party guests, while our birthday theme personalised banners offer sophisticated options for milestone celebrations and formal family events.
Each banner is professionally printed on quality materials with your choice of finishing options to ensure durability and visual appeal. Our indoor use personalised banners provide budget friendly solutions for home parties, while premium outdoor options withstand unpredictable UK weather. Create something truly special that transforms your celebration space and becomes a treasured memory long after the party ends.
FAQ
What size should I measure for my event banner?
Measure the wall or area where the banner will hang, accounting for space needed for attachment points like hooks or tape. Include extra space if you plan to frame the banner or surround it with additional decorations like balloon garlands or streamers.
How long does it take to receive a personalized banner in the UK?
Standard production takes one to five working days depending on design complexity and material choice. Next day delivery may be available for rush orders but requires ordering before midday cutoff times and costs significantly more than standard shipping.
Can I reuse my personalized banner for future events?
Banners made with premium materials and proper finishing like reinforced edges are highly reusable if stored flat in a cool, dry place away from direct sunlight. Avoid reusing banners exposed to harsh outdoor weather unless they were specifically made from waterproof, UV resistant materials designed for multiple uses.
What common image issues should I avoid when personalizing my banner?
Use high resolution images of at least 300 DPI to prevent pixelation and blurriness when enlarged to banner size. Avoid small or low quality phone photos that appear sharp on screens but lack sufficient detail for large format printing, resulting in disappointing, unprofessional looking banners.